
6/14/2020
In the previous post, UI Automation for Monitoring & Observability, we learned how synthetic transactions could be used to enable application monitoring from a human perspective. We saw how easy it is to start collecting metrics from synthetic transactions by writing a few lines of Python code with Selenium to drive the UI automation.
However, since I wrote this code on a Windows machine, and used a Windows Chromedriver binary, you might have to tweak your setup a bit to get it working on your Linux or Mac machine. Yes, you could skirt around this issue by utilizing Python virtual environments, but sometimes those can be tricky too. There is another way to ship this code to other environments that is even more portable than using Python virtual environments, and it seems to be what all the cool kids are doing these days -- Docker Containers!
Shipping your code on a Docker Container allows your code to run on any machine that hosts a Docker Engine. So what is all this Docker stuff anyways? Well, don't fret because, we'll go over some useful terminology before moving on to deploy our project with Docker. If you're already familiar with Docker, then you might want to skip over the next section.
What is Docker?
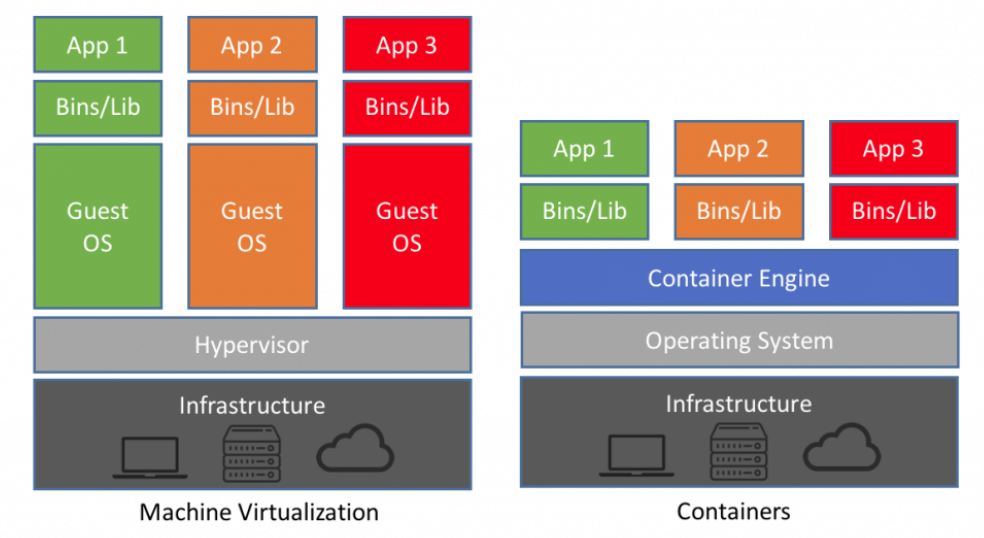
Have you ever wanted to be able to run a Linux Operating System on your Windows or Mac, but not wipe out your existing OS to do so? Maybe you have used something like VMWare or Virtualbox to run a virtual operating system inside of your Windows host. These are cases where an entire virtualized operating system is running inside of a physical host machine. These are commonly called virtual machines. In comparison, Docker can run on top of the host machine in the form of a Docker Engine. The Docker Engine is capable of running multiple Containers which are isolated environments containing the libraries and configurations needed for a particular application to run. Containers are essentially light-weight versions of an operating system and are much smaller than a traditional Virtual Machine.
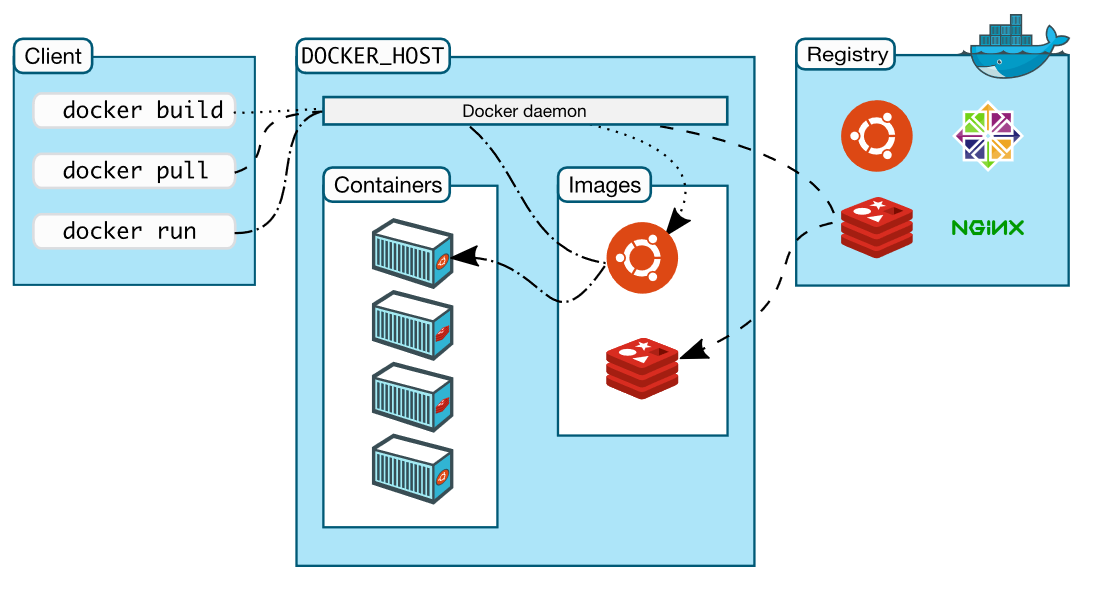
So where do we get Containers from? We "run" Containers from Images that have been "built". We can build images ourselves using a docker build command, or we can fetch ready to go Images from a Registry like https://hub.docker.com/. Docker Hub has Images for just about anything you might want. There are Images for different versions of Python, bash, Go, NGINX, Ubuntu, Java, MySQL, Redis, Prometheus, Grafana, Alpine Linux, etc. etc. etc. Just visit Docker Hub and search for whatever type of Image you may be interested in. Basically, Docker Hub is like a GitHub, but for Docker Images instead of code repositories. Keep in mind that Docker Hub is not the only Registry around. You can manage your own private registry with many Cloud providers like AWS, GCP, Azure, and several other places. Generally, any Image you come across in the wild, started out from some base Image found on Docker Hub. Once you pull an Image from a Registry, you can simply run a docker run command to start the Container.
Besides simply running programs and applications inside of isolated Containers, Docker also provides storage and networking capabilities. To persist data over Container restarts, you would make use of Docker Volumes. On the networking side, you can enable port binding between your Containers and the host machine, and allow Containers to communicate with other Containers as well as the outside world with Docker Networks.
Let's take a look at how we can package our Synthetic Transactions project into a Docker Container.
Containerizing Our Synthetic Transactions Project
To start with, if you don't already have Docker Desktop installed on your machine, then go ahead and visit https://www.docker.com/products/docker-desktop to download and install it. Note that if you are using Windows 10 Home Edition, then you will not be able to install Docker Desktop on your machine due to some missing components. An upgrade to Windows 10 Pro is sufficient to successfully install Docker Desktop on Windows 10.
We will be building a Docker Image that will hold the code we have written for the Synthetic Transactions project, and we will build our image based off of some base image that we will pull from Docker Hub. Alpine is a very lightweight Linux distribution and is a popular Docker Image to get started with. However, it would also be nice to have an Image with Python already installed on it so that we don't have to do that ourselves. Well, we're in luck! Searching for "python" on Docker Hub leads us to the Docker Official Images registry for Python - https://hub.docker.com/_/python.
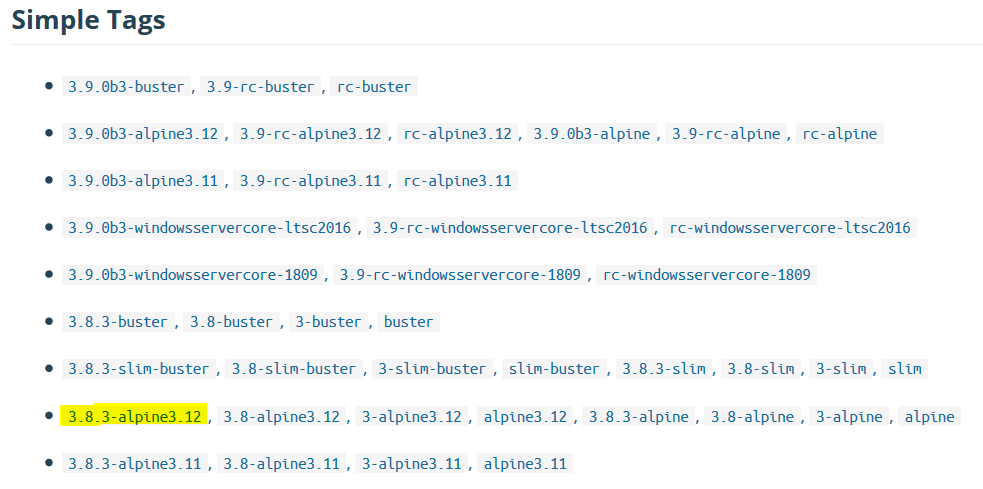
On the official Python images page, we can scroll down and take a look at the various Tags for the Python images. We see that there is a Python 3.8.3 which is the same version we used in the previous post https://airpa.io/post/ui-automation-observability, and it seems that one of the latest Alpine Linux versions is 3.12. Perfect, let's take it! But how?
Well, we could run a command docker pull python:3.8.3-alpine3.12 and then run several other commands, in some cases long commands that involve several flags, just to build the Image and run the Container. But, there is an easier way! Let's pull this image and add to it to build our own image using a Dockerfile.
Dockerfile
A Dockerfile is basically a configuration file that tells Docker how to setup an image that you want to build. They are fairly straightforward to understand and configure. We tell Docker how to setup an image for our Synthetic Transactions project in about 26 lines...
FROM python:3.8-alpine3.12

# Update apk repo
RUN echo "https://dl-4.alpinelinux.org/alpine/v3.12/main" >> /etc/apk/repositories && \
    echo "https://dl-4.alpinelinux.org/alpine/v3.12/community" >> /etc/apk/repositories

# Install the chromium browser and driver
RUN apk update
RUN apk add chromium chromium-chromedriver

# Upgrade pip
RUN pip install --upgrade pip

# Create a folder for our project
RUN mkdir -p /synthetic_airpa
WORKDIR /synthetic_airpa

# Copy and install our requirements.txt dependencies
COPY requirements.txt /synthetic_airpa
RUN pip install -r requirements.txt

# Copy our python script inside /synthetic_airpa
COPY syn_airpa.py /synthetic_airpa

# Run our python script
ENTRYPOINT python3 syn_airpa.py
Let's go over what the commands in our Dockerfile tell us.
- FROM tells Docker which base image to pull and build on top of
- RUN is simply, in this case, Alpine Linux commands to run inside the image
- WORKDIR is Docker's way of saying which directory we should change to and work in
- COPY is a way to copy objects from our local machine into the Docker Image
- ENTRYPOINT is the command that will run when we run our Docker Container
Now that we have a Dockerfile that tells Docker how we want to build our image, lets go ahead and build it.
Docker Build
Just one short command is needed to build our Docker Image.
docker build --rm=true -t synthetic-airpa .
The -t flag is for "tag". We tag our image with the name synthetic-airpa. The --rm=true flag tells Docker to remove any intermediate containers after a successful build. If you don't use the --rm=true flag, the you may notice several containers with a <none> tag when you run the command docker container ls to list your containers.
The . on the end tells Docker to build using the files from our current working directory, this is where the Dockerfile lives, and that is how Docker will find the Dockerfile and build from it. Note that our directory structure on our local machine should look like the following:
ui-automation-docker/
    venv/
    .dockerignore
    .git
    .gitignore
    chromedriver.exe
    Dockerfile
    README.md
    requirements.txt
    syn_airpa.py
Docker Run
Our Image is built, so without further a do, let's run this thing and see what it does.
PS C:\projects\ui-automation-docker> docker run synthetic-airpa
Landing page load time:          1.0897490978240967
Login time:      0.5823976993560791
Logout time:     2.2085256576538086
And that's all there is to it. Our Container starts in nearly no time at all, runs the syn_aripa.py script and then stops.
Wrapping Up
You can find the Github repo containing all of the code and Dockerfile at https://github.com/airpaio/ui-automation-docker.
Here we packaged our Synthetic Transactions project code into a Docker Container that can be run on any machine hosting a Docker Engine. This code is now easily portable across any environment as long as there is a Docker Engine that can run the Container that we spun up.
The next part of our journey into Application monitoring & Observability will focus on how to automate the fetching of the Synthetic Transaction metrics (or really any other types of metrics), and of course we will be using Containers!
Check out Part 3 - https://airpa.io/post/synthetic-transactions-prometheus-grafana