

6/12/2020
Say you have a sizable portfolio of applications that serve as a critical part of your business. How do you know that your applications are functioning properly? Do you monitor them? How do you monitor them? Maybe you run your infrastructure on AWS, and you have setup some automated metrics and alarms with Amazon CloudWatch to tell you if the underlying server that is hosting your application is running with high CPU usage or disk utilization. Great, now we know when our server is running hot!
But is high CPU usage really a problem? Maybe a spike over the span of a few seconds isn't such a big deal. What if your CPU usage has been topping out over the course of several minutes? Great, we have a server that is working hard! But is that really a problem? Is the server still doing what it is supposed to do?
Maybe you're collecting metrics on whether your database is an UP/DOWN state perhaps has high table space usage. Do you send a simple web ping to your application to check if you get a 200 response back? That should tell you if your application is UP, right?
So your server, database, and web pings all indicate that everything is fine and you're not getting any alarms, but somebody has just raised a ticket with a short and sweet message that simply says "hey, this website is not working". Hmm, well, I wonder what is not working? All of the infrastructure seems to be up and running. Maybe the application has somehow disconnected from a perfectly function database, or maybe we have lost connection to our authentication server. What does "working" even mean?
Whether you have metrics that are in an Alarm state or not, it's almost always guaranteed that that some end-user somewhere will be reporting that something is not working right. So what does "working" mean? The end-user is not going to care whether they reach the application from a load balancer on node A or node B. They are not going to care if the application is fetching data from the Primary DB or the Read-Replica. The human end-user just wants the app to work. They login, get to the view they're interested in, get the information they need, and get out. That is the definition of "working" from the human end-user perspective.
Sometimes critical information regarding the health of your systems will come straight from the people using your applications. It would be great to automatically monitor the human perspective, but how do we do that? Whether you call it Robotic Process Automation, UI Testing, or just plain ol' programming, fortunately, there are great tools available that make mimicking human behavior a breeze, and we can use these tools monitor and collect metrics on your application from the human perspective.
This blog post is the first is a series that will take us through how to perform UI automation to collect application metrics, ways to automate the collection of metrics, and how to deploy end-to-end solutions. So join me as we get started with the first step of mimicking the human with UI automation.
Synthetic Monitoring
Mimicking user interaction with applications through UI automation what we call a synthetic transaction. We can perform synthetic transactions using different types of tools like Robotic Process Automation software or UI Testing software. In the examples to come, we will be using Python and Selenium to drive synthetic transactions on a web application. In particular, we will be automating the login and logout actions on this very blog website. You will need to register as a user at https://airpa.io/signup , but don't worry, I'm not harvesting or selling your personal data, and I won't be spamming your inbox. This is just a simple sign-up so that you can post comments to blog posts (and play around with synthetic monitoring!)
What You Will Need
- An account on this blog (https://airpa.io/signup)
- Python (version 3.8.3 was used for this exercise)
- Chromedriver for driving the web UI automation with Selenium. Make sure you download the version of Chromedriver that matches the version of your Chrome browser.
I ran this exercise on a Windows 10 machine, so your setup may be slightly different than mine. We will be working with Python virtual environments here, and also in a later post, we will walk through how we can package our program and deploy it to nearly any environment.
The Code
Clone the repo https://github.com/airpaio/ui-automation.git onto your machine in a location where you want to your project to live.
PS C:\projects> git clone https://github.com/airpaio/ui-automation.git
This should create a directory named ui-automation under your C:\projects directory.
Next, download the Chromedriver and place it in the ui-automation directory. Now we want to create a virtual environment to keep our dependencies clean and stable across any global python environment updates. To do so run the following command in your ui-automation direcctoy:
virtualenv venv --python=python
Note that the python on the right-hand side of the = should be in your PATH environment variable wherever your python executable is located on your machine when you installed Python. This command will create a new directory named venv within your project directory. My directory structure looks like:
ui-automation/
    venv/
    .git
    .gitignore
    chromedriver.exe
    README.md
    requirements.txt
    syn_airpa.py
Now we need to activate our virtual environment which is done with a script inside of the venv directory. Run the command
./venv/Scripts/activate.ps1
You should pick your activate.* script depending on what platform your are working on. You will know that your virtual environment is active if your command prompt has a preceding (venv) on it.
Now that the virtual environment is activated, we can use pip to install the other Python ependencies. The two dependencies contained in the requirements.txt file are
selenium==3.141.0
urllib3==1.25.9
We install these dependencies with a simple run of the command
pip3 install -r requirements.txt
UI Elements
Before we jump into the Python code, let's go over exactly what we want to do regarding a synthetic transaction. With our airpa.io credentials, we want to
- Navigate to https://airpa.io/login
- Enter username
- Enter password
- Click the login button
- Ensure that we are indeed logged in
- Log out
When it comes to UI automation projects, before I write any code, I like to have these steps explicitly laid out. After I have the steps laid out, I will capture the XPath's or Selectors from the HTML elements so these parameters will be ready to go when writing the code. Whether you use XPath's or Selectors or some other type of element identifier, can be a matter of personal preference, but also may depend on which tool you are using to drive your UI Automation. I like to use XPath's because, they are usually pretty simple to work with, and in my experience they tend to work well with Python-Selenium projects.
So how do you capture the HTML element's XPath? Simply open your Chrome developer tools by right-clicking on the UI element you're interested in and choose "Inspect" as seen in the below screenshot:
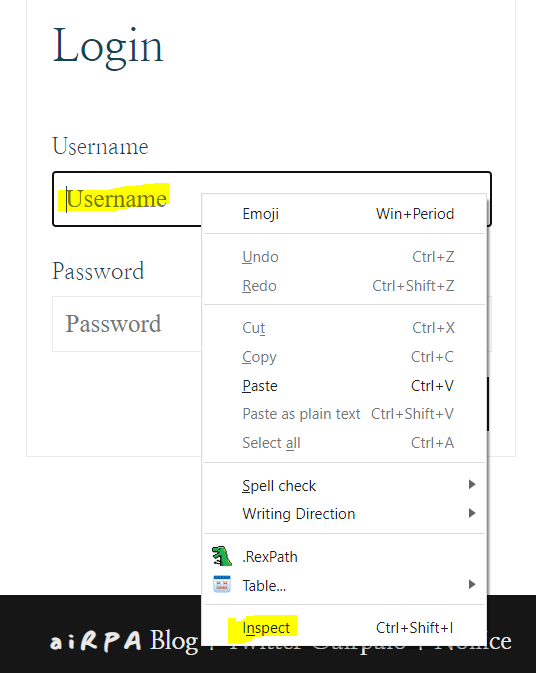
Your developer tools pane should open up with a focus on the HTML element that you chose to Inspect, in this case, the Username text box. Now just right-click on the line containing the HTML code of your element and choose "Copy XPath".

We need to do this for each element that we need to interact with, and if you take a look in the syn_airpa.py file you will see a comment block section where I laid out the UI actions and each of their XPath's.
## UI ACTIONS - these are the steps we need to take with their xpaths ##
# navigate to https://airpa.io/login/
# Username text box xpath = //*[@id="authcontainer"]/div[1]/input
# Password text box xpath = //*[@id="authcontainer"]/div[2]/input
# after typing password, click login button xpath = //*[@id="authcontainer"]/div[3]/button
# login banner xpath = //*[@id="authenticator"]/div[1]/h2
# hamburger menu xpath = //*[@id="menuIcon"]/div
# logout button xpath = //*[@id="signoutButton"]
The Synthetic Class
In syn_airpa.py I have created a class named synthetic with methods to make piecing together the UI action steps a bit easier. The class is initiated with an instance of the Chromedriver. Once the class is initiated, we just need to piece together the UI actions by calling the appropriate methods from the class.
class synthetic():
    '''
    synthetic includes methods needed for navigating around the airpa.io web pages
    '''
    def __init__(self):
        self.driver = webdriver.Chrome(options=chrome_options, executable_path=chromedriver_path)
        self.wait = WebDriverWait(self.driver, 20)

    def goto_url(self, url):
        self.driver.get(url)

    def enter_text(self, text, xpath):
        elem = self.driver.find_element_by_xpath(xpath)
        elem.clear()
        elem.send_keys(str(text))

    def click_action(self, xpath):
        elem = self.driver.find_element_by_xpath(xpath)
        elem.click()

    def wait_until_element_loads(self, xpath):
        self.wait.until(EC.visibility_of_all_elements_located((By.XPATH, xpath)))

    def wait_until_page_loads(self, parent_class):
        self.wait.until(EC.visibility_of_all_elements_located((By.CLASS_NAME, parent_class)))

    def close(self):
        self.driver.quit()
From an application monitoring perspective, one thing we will be interested in is the duration of time that each action takes. For example, how long does it take for the HTML content to render when we land on the page https://airpa.io/login? Or, how long does it take for the next page load to take once we hit the login button? To assist in timing these events, I have two methods in the class named wait_until_element_loads() and wait_until_page_loads(). The self explanatory method names indicate that we will wait until the entire page loads, or we wait until a particular HTML element finishes loading before the program proceeds.
Code Timing
Last but not least, I have divided the code into three sections to capture timings of
- Fully loading the landing page at https://airpa.io/login
- The time from clicking the login button to having a particular HTML element become visible on the next page
- The time taken to click a logout button and have the page fully load after logging out.
ui = synthetic()
start = time.time()
ui.goto_url("https://airpa.io/login/")
ui.wait_until_page_loads("default")  # initial landing page load completed
landing_page_load_time = time.time() - start

start = time.time()
ui.enter_text(username, '//*[@id="authcontainer"]/div[1]/input')
ui.enter_text(password, '//*[@id="authcontainer"]/div[2]/input')
ui.click_action('//*[@id="authcontainer"]/div[3]/button')
ui.wait_until_element_loads('//*[@id="authenticator"]/div[1]/h2')  # login completed
login_time = time.time() - start

start = time.time()
ui.click_action('//*[@id="menuIcon"]/div')
ui.wait_until_element_loads('//*[@id="signoutButton"]')
ui.click_action('//*[@id="signoutButton"]')
ui.wait_until_page_loads("default")  # logout completed
logout_time = time.time() - start
ui.close()
Security
Don't forget to use your own username and password for the airpa.io account you created. Also, it is bad practice to use plantext credentials in a production environment. Ideally, you should utilize a secrets manager with an API that you can use to fetch credentials.
Running the Program
After you have changed the username and password to your own credentials, you can run the program and you should see some output like the following.
(venv) PS C:\projects\ui-automation> python .\syn_airpa.py

DevTools listening on ws://127.0.0.1:53263/devtools/browser/6880f397-b90e-4118-853a-1d71a5bd1012
Landing page load time:          4.187515735626221
Login time:      0.4770009517669678
Logout time:     2.19010329246521
Wrapping Up
When you're done working in your virtual environmnet, simply type and run the command deactivate and your command prompt should return back to normal.
What have we accomplished? Well, we took a simple example of web UI automation and captured some timing metrics on different UI actions that we took. This exercise serves as a basis for collecting synthetic transaction metrics for application monitoring. While we only implement a simple login/logout process here, in a more critical setting this example can (and should) be extended to include exception handling and even capture metrics on exception handling, e.g. you could use a boolean flag to indicate whether a particular text has rendered on the page on each run or even capture when a timeout has occurred.
Capturing these metrics over time and looking out for any anomalies could provide critical visibility into whether this application is performing up to it's expectations. How do we automate this, and where do we even deploy this type of metrics collection? These are questions that will be answered in upcoming posts in this series.
Check out Part 2 - https://airpa.io/post/ui-automation-observability-docker